| Table of Contents | ||||
|---|---|---|---|---|
|
Step 1 - Create your bot
![]() for Jira administrators
for Jira administrators
Before you begin to receive notifications, Jira administrator must establish a connection between Telegram and Jira itself.
All communication between these services is performed via your custom telegram bot. If you don’t have one, please use the official documentation to get your bot. (see here)
| Info |
|---|
Here is a quick guide how to:
|
Step 2 - Set up connection
![]() for Jira administrators
for Jira administrators
After add-on installation Jira administrator must go to Settings → Manage apps → Telegram Connector → Telegram Bot to establish connection between Jira and Telegram.
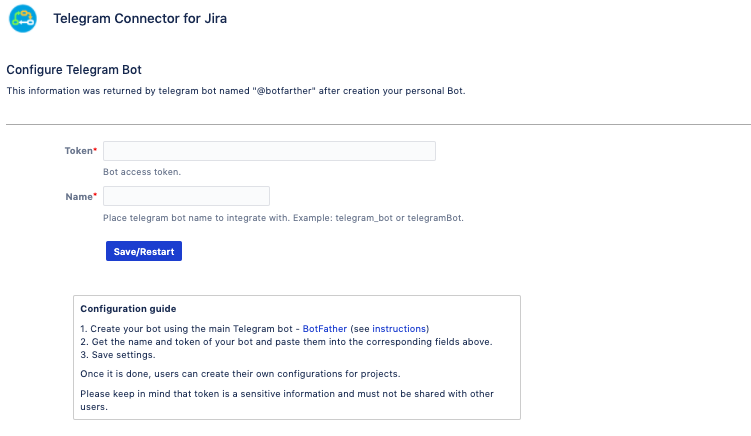
Here administrator must add crucial information about created Telegram bot:
Bot name
Access token.
This information is given only to bot creator from BotFather. Alongside with other control options.
After configuration is saved, service connection is complete. Now users can set up their own notification rules.
| Expand | ||
|---|---|---|
| ||
Configuration List All created configurations of Telegram connector are listed on this page. Log On this page administrator can track configuration events or erros that took place. Threads This section controls parameters of plugin productivity and memory usage.
It is not recommended to change parameters in this section without strong understanding of these consequences. |
Step 3 - Create configuration
General Info
Each project administration section gets a new menu after add-on installation.
(Project settings → Telegram connector settings)
Connector has 2 modes based on their functionality:
Events - sends notifications to Telegram group chat triggered by events in Jira.
Reports - sends scheduled reports on issues.
Project administrator can easily switch between modes by clicking on the corresponding button:


Users can be notified on events happening with your project or issues via Telegram group chats. All notifications are sent from Jira on behalf of your custom bot used for the whole Jira instance.
Each project administrator can set up configuration that will notify on certain events.
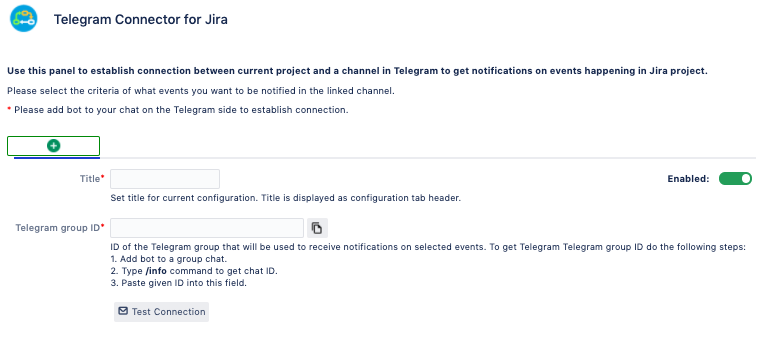
To do so go to Project settings → Telegram Connector. On this page you can create as many configurations as you want as long as they use different Telegram group ID.
Events
Here project administrators have the ability to set up connection between current Jira project and required Telegram chat.
Each project can have limitless number of configurations for Telegram chat. To create a new setting, find “New Setting” and fill in the required information.
There are 3 main blocks in any configuration tab:
Webhook URL
Filter
Author
Events
Telegram Group address
To start creating a configuration user must fill in the required fields:
Title (will be used as configuration name)
Telegram group ID
| Info |
|---|
How to get Telegram group ID
|
You can always test your connection to see if it is set up correctly by clicking on "Test Connection” button.
Filtering
| Anchor | ||||
|---|---|---|---|---|
|
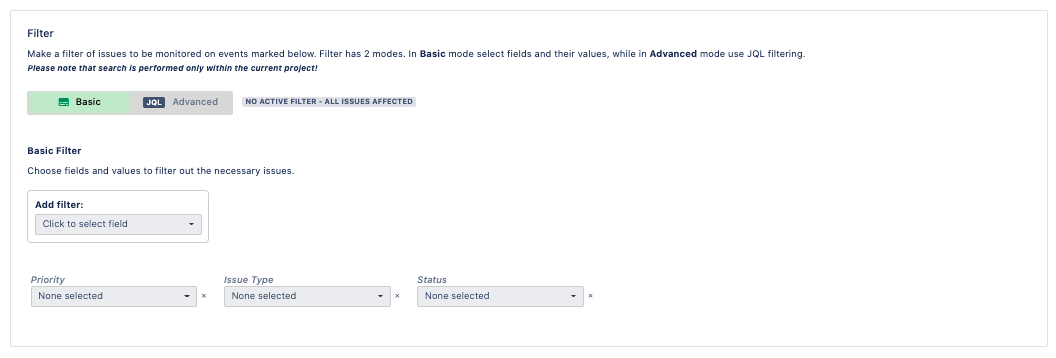
Basic/JQL filter
By default if any selected event (see Events section below) takes place in any issue in project - a notification will be immediately sent to Telegram group chat. If you want to limit the number of monitored issues, 2 modes of filtering are available: Basic and Advanced.
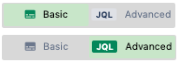
You can switch between filtering modes by clicking on the corresponding toggle. Note that only one filtering mode can exist at a time.
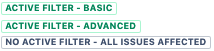
Label next to the toggle element will give a hint on what filter mode is configured for current setting.
Basic
Advanced
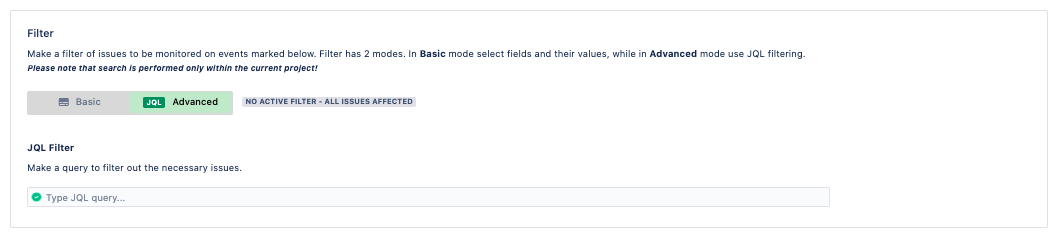
Filter update will take effect immediately after saving settings and will erase another filter mode if configured.
Author
As administrator you can narrow down notification on events depending on who is their author. i.e. Who performed the action from the selected events list (see Events section below).
For example you can set up notifications to be sent only if they are performed by some core users (like managers or team leads) or a specific team. This can be done by defining specific users or via user groups.
Or you can exclude notifications of events performed by specific users simply mentioning them in the field “Exclude users”.

Events picking
After managing the Telegram group ID and bot commands users can select events they want to be notified on. Each configuration is split by sections of events depending on their specifics:
Comment
Issue
Worklog
Versions
Sprint
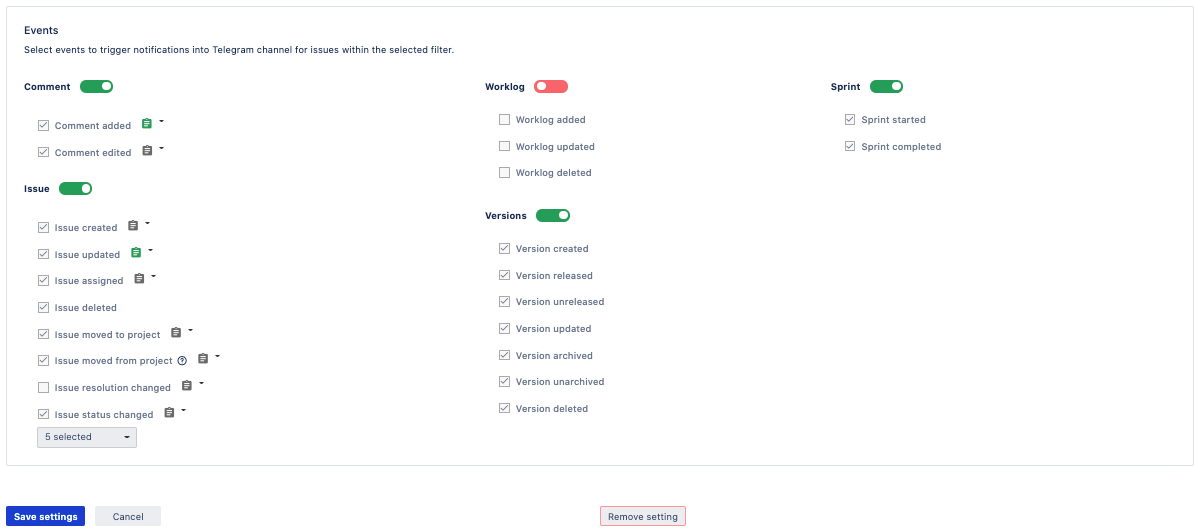
Activating toggles next to events will enable sending notifications to Telegram chat as soon as this event takes place in Jira.
To enable/disable the whole event column - activate or deactivate toggle for the whole column.
| Expand | ||||||||||||||||||||||||||||||||||||||||||||||||||||||||
|---|---|---|---|---|---|---|---|---|---|---|---|---|---|---|---|---|---|---|---|---|---|---|---|---|---|---|---|---|---|---|---|---|---|---|---|---|---|---|---|---|---|---|---|---|---|---|---|---|---|---|---|---|---|---|---|---|
| ||||||||||||||||||||||||||||||||||||||||||||||||||||||||
| ||||||||||||||||||||||||||||||||||||||||||||||||||||||||
Extra fields
Each card has its own set of fields, yet for some events you can set up additional fields to display in the cards sent to Telegram group chat.
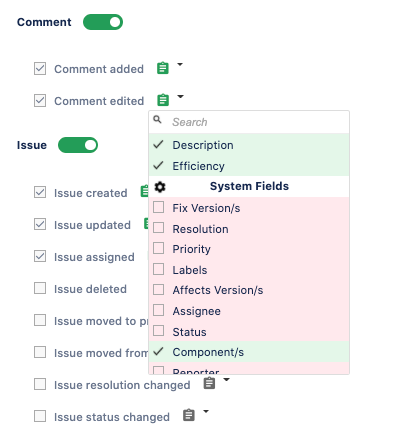
You can see an icon next to some events, clicking on which would open a drop down list of fields. Search and select the field which value you want to be displayed in the card sent to Telegram group chat.
After all settings have been set, save them to apply changes. As soon as they are saved, notification will start reaching your channel.
Press Save to apply your changes.
Reports
This mode allows administrators to send scheduled reports to Telegram chat.
To to set up a report project administrator must take 3 simple steps:
Select Report Type
Configure issue filter
Set up the schedule
I. Report type
Report type | Description |
|---|---|
Custom sprint | Sends report on issues in the selected Sprint(s). |
Active sprint | Provides reports on issues in currently active Sprint(s). |
Issue count | Lists issues matching the selected filter. |
Progress | Shows aggregated progress state of issues in filter. |
No transitions | Lists issues that have status not changed. (Based on Minimum overdue) |
No updates | Lists issues that have not been updated. (Based on Minimum overdue) |
| Info |
|---|
Some reports require filling extra field to make this report work. For example "Custom Sprint" report requires selecting the specific Sprint related to current project while "No transitions” and "No updates” reports demand setting a "Minimum overdue”. Minimum overdue - is the time delay since last event occurrence and current time. If selected report events happened before the minimum overdue period, it will be included into report. |
You can select report’s owner. Each report must have an owner as his/her permissions will be counted while building report. i.e. if report owner has no permission to view the issue it will not be included into the report.
If no owner is set - current user will be set as report owner.
II. Filter
Issue Filter functionality is identical to the one in the Events, but relates to Reports only.
Please see instructions here.
III. Schedule
This section is designed to create schedule when reports are to be sent to the Telegram group chat.
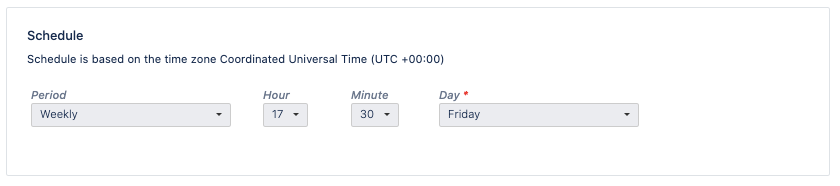
First, pick the period of the report schedule. Then fill in the additional fields depending on the selected period.
Each period has a different set of fields that help to adjust the correct time for sending report. You can see the fields corresponding to each of the periods below:
Period | Hour | Minute | Day of week | Mode | Day of month |
|---|---|---|---|---|---|
Daily |
|
|
|
|
|
Weekly |
|
|
|
|
|
Monthly |
|
|
| First day of the month |
|
Last day of the month |
| ||||
Custom day of the month |
| ||||
Once in | This type of period has a unique set of fields and logics behind it:  | ||||
While period types like Daily, Weekly and Monthly send reports only once in a specified day and time, the "Once in" type lets you get reports more frequently and within a range of days and time.
| Note |
|---|
Telegram is a separate tool. Due to this fact there is a small chance of network connectivity related issues. |
| Note |
|---|
Jira administrators can keep track of these possibilities and not only via Audit Log page in Manage apps section. All errors and major events related to connector configuration can be met there for further investigation. |